Showing posts with label Clip Frames. Show all posts

Thursday, April 27, 2017

April projects by Vera Shelemekh

Hello Blue Fern Studios fans!
Vera is here and I'm happy to share some inspiring projects with you. This month I keep on playing with Spring Parade collection scrapping my Easter photos... But first let me show you the Chesterville layout which I like a lot.

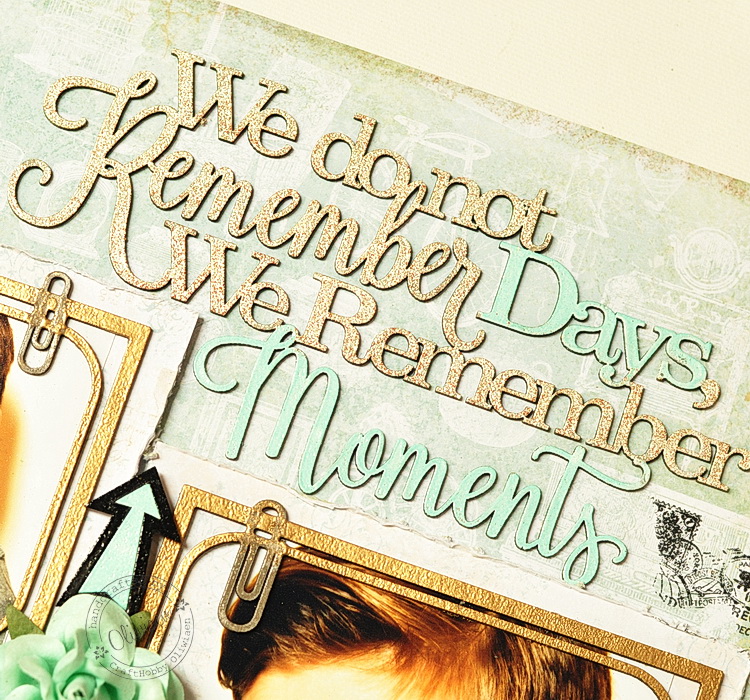
The layout keeps memories of our house renovation. Our kid was feeling really excited to help with this and that. I used  Chesterville - Whitford as the background adding Textured Wildflowers chipboard covered with Antique gold embossing powder.

 The photo is framed into a bigger Clip frame painted with white acrylic paint.  I used one of the Chunky words for the title.


Essential textures stamp helped me to add some more details to the background. And the bricks are covered with Mermaid glitter.
 
Blue Fern Studios products used:
 
Papers:
Chesterville- Whitford
 
Chipboards:
 Clip frames
Textured Wildflowers 
Chunky Words
 
Embossing powders:
Antique gold
Glitter:
Mermaid
Stamps:
Essential textures
------------------------------ 

And now Spring inspiration.
The layout is the present for my good crafty friends. For the background I used Whimsy from Paisley&Vine collection. The composition consists of a lot of Spring parade fussy cut elemens, Circle vine frame covered with lime embossing powder and paper flowers including  the Spring lily


I also made some stamping with Deja Vu and then cut the elements
 
Blue Fern Studios products used:
 
Papers: 
 
Paisley&Vine - Whimsy
Paisley & Vine - Playing Cards
Spring Parade - Remembrance
Spring Parade - April Medley
 
Chipboards:
Circle Vine
 
Embossing powders:
Lime
Flowers:
Spring lilies

Stamps:
Deja Vu

------------------------------ 
And at last some Easter memories. The kids were searching for chocolate eggs in the garden and I took some pictures and made this mini tunel album.

 The characters from Spring parade should be already famaliar to you. The fussy cut bunnies are so nice and the flowers so springy.
On the spreadsheets I used Easter chipboards: Classic bunnies and Easter Egg Ornaments all covered with Icicle embossing powder.


Blue Fern Studios products used:
 
Papers: 
Spring Parade - Joyful 
Spring Parade - May Vignettes 
Spring Parade - Spring Petites
Spring Parade - Sunday Best
Spring Parade - April Medley 
 
Chipboards:
Classic Bunnies
Easter Eggs Ornaments 
Blooming Foliage
 
Embossing powders:
Icicle
Flowers:
Late winter lilies
 
Thank you for stopping by and see you in May *)
 

Tuesday, August 16, 2016

August Projects by Maja

Hello everyone, welcome to the Blue Fern Studios blog :-)

I have some projects for you today. All are based on the Attic Charm collection, filled with pastel colours and delicate designs, perfect for many kinds of projects! But they are not limited to sweet romantic or girly pages! I have made two boy layouts using this collection ;-)
Let's begin with a soft teal and gold page:


The title of the layout is the large Remember Moments piece that I embossed with Oatmeal and Sea Mist embossing powders:


I stamped some Journey stamps in the background, and then put my photos in Clip Frames. I used three embossing powders to add colours to the pieces: words with Ebony, clips with Mushroom and frames with Ginger:


I used one of the quotation tags from the Calling Cards sheet and added some flowers to match the colour palette:


We Do Not Remember Days:
Papers: Attic Charm: Spring Posy, Generation, Calling Cards
Chipboard: Remember Moments, Clip Frames, Directions
Flowers: Attic Charm Glitter Roses, Tranquil Roses and Lilies, Tranquil Blooms
Stamps: Journey
EP: Ginger, Oatmeal, Mushroom, Ebony, Sea Mist


And here's the other boy page, this time focusing on green shades of the papers from the collection, and many varietes of green embossing powders. They were a perfect choice for my green-eyed nephew's photo :-)


I used the Attic Key paper for the background, added some texture with a stencil and some stamping:


For the title I used the Dare to Dream piece that I embossed with Verdant and Lucky powders:


To decorate the page further I used the Lucky piece of the Charmed Page Dangles and added some colour to it with Copper, Lucky and Grassy Knoll embossing powders...


...and selected flowers from the Coursthip Blooms and Glitter Roses sets:


Lucky:
Papers: Attic Charm: Attic Key, Generation
Chipboard: Dare to Dream, Charmed Page Dangles, Postage Frames
Flowers: Attic Charm Glitter Roses, Courtship Blooms
EP: Grassy Knoll, Clover, Lucky, Verdant, Copper


The Attic Charm collection is perfect for many kinds of projects, not only layouts. Here are two cards I made using these beautiful papers. Here's a baptism card featuring the filigree Ornate Cross piece:


I added some machine sewing and delicate white and pink flowers:


 The soft pastel colours of papers from the Attic Charm collection are ideal for wedding projects too:


I placed a stamped sentiment in the smallest of the Psotage Frames piece and added two Mini Flourishes. All pieces are embossed with Oatmeal:


I finished off my design by adding some Tranquil Roses and Blooms, vintage ribbon and waxed string bows:


Baptism Card:
Papers: Attic Charm: Foyer, Mercantile
Chipboard: Ornate Crosses, Mini Flurishes, Postage Frames
Flowers: Courtship Roses, Tranquil Roses and Lilies
EP: 14 Karat

Wedding Card:
Papers: Attic Charm: Attic Key, Calling Cards
Chipboard: Postage Frames, Mini Flourishes
Flowers: Courtship Blooms, Tranquil Blooms, Tranquil Roses and Lilies
EP: Oatmeal

That is all for today, thank you very much for visiting the blog!

Tuesday, June 14, 2016

Three times mixed media with Attic Charm by Wilma Voermans.

For this layout I used the monthly sketch which you will find here.
Orange is a favorite color for me, to use in vintage aswell as modern layouts.
This picture shows my daughter ready for travelling on the station.
The whole scene gave me a vintage feeling. I love that picture.
My starting point was the KEY paper (B-side).
I use mostly B-sides of papers, no intention, I just like them better ..

The sketch ( I turned it)


For the orange color I  used beads


I colored the white daisies with the orange heart with paint and gesso.
Afterwards I felled sorry for this, because 1 week later my son married.
And what had the bride in her bouquet??? White daisies with a orange heart !
And my beautiful white ones are used....


The lamppost is grunged up with embossing , gesso and paint.
To mimic the brigthness where the lightsource comes from I used golden paint ,
over golden embossing
*******

Second layout is also based on the June sketch.....
It was supposed to be  masculine, since I used a photo from one of my sons.
But there is a difference for me  between very masculine pictures for example in black and white.
This picture is in soft colors , so I did not overdo the masculine theme.


I started with the Sachet paper ( B-side)  out of the Attic charm collection.
My favorit without a doubt..
Colored the background with pastels and water., but left the beautiful pattern to show through.
In the background there are a few soft flowers that I covered up with gesso and my photocluster.
With a black perlpen, I draw random figures.
Than with a mask some greyish/blue inking.


The chipboard is a frame piece ,  one of the clipboard set.
I cut it up, used one as my love you title and the rest here and there over the layout.
I made a mix from nutmeg and oatmeal powder.
The color gets less intensive because of the oatmeal. 
Tip for summerlayouts: Oatmeal is super for beachthemes!

The titel is just inked up with black drawing ink

*******


My last layout for today is also in green/orange  Like the first one.
It just came out this way :) 
Although the orange is not that obvious like the first layout.


The start of the layout was on the beautiful Generation paper (Yes, again the B-side).
Starting off with two colors orange ink.  (offcourse first clear gesso )
Random heavy gesso, and than different shades of green embossing sprinkled over the background.
I have many many colors Blue Fern Studios embossing powder.
It is  such a luxury to pick the colors out of the whole range.
Here I used verdant and Lime..
Heatset it.
Than with a foliage stencil again heavy gesso.


The chipboard pieces I used are all embossed with pearl embossing powder.
Flourish, winter page dangle and title.


Thanks for visiting the blog, 
I hope you liked my post.
x Wilma x


Wednesday, March 16, 2016

March Layouts by Maja

Good morning, BFS Fans, welcome to the blog today :) It's Maja here to share three layouts I made using our latest collection, Courtship Lane. 
Ladies first, so let's start with a girly page :)


I like to layer papers for the background and add stamps - and so I did here. For the top layer I chose the Concert Hall paper as the young lady in the photo plays the violin. I also matted the photo with various papers and formed a semi-frame using Whimsy Flourishes, "closed" on the other side of the photo with the Village Sign Post piece embossed with Copper ep. Then I added some flowers and embellies:


The title word "Happy" is embossed with three eps in the purple palette for an ombre effect:


Papers: Calling Cards, Concert Hall, West Plaza, Royal Street
Stamps: Deja Vu, Forever, Vintage Edges
Chipboard: Whimsy Flourishes; Happy, Heart, Love;Village Sign Post
EP: Iris, Lilac, Mystic Plum, Verdant, Copper

For my second layout I opted for a cheerful spring palette of colours. This time the background features only one paper, Parkway, and no stamps.


I used several designs to mat the photo and they fill the beautiful frame Clip Frames set. I added colour to it with two shades of green embossing powders: Sage and Lime. I made the words stand out by embossing them with Oatmeal ep. Together with the large "Handsome" piece (embossed with Honey) they form my title:


Then I added some chipboard accents from the Arrow Words and Directions sets - to highlight them against the green frame I used Copper ep to emboss. I also added pieces of the Chickenwire Panel that I left saute.


I use flowers also on my boys' layouts, as they still don't mind ;) Here I used beautiful Courtship Blooms and Courtship Roses:


Papers: Parkway, Royal Street, Calling Cards
Chipboard: Handsome, Arrow Words, Directions, Clip Frames, Chickenwire Panel
EP: Sage, Lime, Copper, Oatmeal, Honey

And finally my last layout for March for which I chose orange tones of papers and embellishments:


I composed my background by tearing the house image off the West Plaza paper and layering the rest upon the Lover's Lane sheet. Then I added some stamping and a backet pattern using white modeling paste and stencil and then splashed some tangerine, golden and white mists:


Using two pieces from the Circle Groups I arranged a triangle-shaped design under the photo. I embossed them with Ginger ep and added some pieces from the Cogs & Gears set. I embossed them with Nutmeg ep for more contrast and placed upon or inside the circles:


One of the Arrow Words makes my title - I embossed it with Copper ep because it's very glittery and really makes this small piece pop out:


To finish off my page, I added some Courtship Blooms and metal charms:


Papers: Bourbon Avenue, West Plaza, Royal Street
Chipboard: Arrow Words, Circle Groups, Splattered Circles, Cogs & Gears
Stamps: Widgets
EP: Honey, Ginger, Copper, Nutmeg

I like how by selecting papers I could concentrate on main colours of the collection - green, purple and orange - separately to create varied backgrounds and climates for my pages.

That's all for today, thank you for visiting and see you later!

Maja