Showing posts with label snowflake frame. Show all posts

Wednesday, December 20, 2017

Sparkle by Vija

Okay blog readers, I hope you are ready for this.  Vija Anton, our Blue Fern Fan of the Month, has created a layout that is sweet, adorable, cuddly, cute, and any other charming words that you can think of.  No matter how frazzled you may be as you prepare for the holidays, this layout is sure to warm your heart just a little and bring a smile to your face.  She even decorated the little Christmas tree!


Here it is her layout and what Vija has to say about it:

I love doing layouts using pictures of dogs, mine or friends, and prefer to use regular collections rather than dog specific papers as I feel it gives me more scope to incorporate some mixed media techniques. This layout features a cute little Bichon Frise named Jewel, who belongs to my best friend on Instagram. 


For the background, I used the Homespun paper as a frame and cut around the flower corner to slip the Vintage Christmas paper and die cuts in behind it. I also did a little bit of stencil work on this one to emphasise the lacy pattern on the patterned paper. 


I used texture paste on the Snowflake frame and sprinkled it with seedlings and glitter and the title was finished with more glitter using Silver Bells embossing powder. The gorgeous lace helps soften the layout and adds some further texture. I also 'decorated' the Christmas tree with seedlings. This layout is all about 'SPARKLE'!!


The Blue Fern Products used were:

Paper:
Vintage Christmas Wonderland paper
Homespun Homestead paper

Printed Chipboard:
Vintage Christmas printed chipboard

Chipboard: 
Snowflake frame 
Winter titles

Flowers:
Christmas Blooms

Lace: 
9A, 4

Seedlings: 
Sterling silver

Embossing Powder: 
Silver bells

Thursday, January 5, 2017

January projects by Tartine Peluche

Hi everyone!
I'm so excited to share with you my first projects for Blue Fern Studios;
such an honor and a pleasure to be a part of this fabulous team.
So let me introduce myself.
My name is Melanie, Tartine Peluche on social media. I'm 34 years old and I live Quebec in Canada.
I do principally layouts, sometime cards and canvas. I've been scrapbooking for several years, starting with cards. Since a year I've changed for layouts and I really love that. My style is mostly shabby but I like touch everything and discover new techniques.
What is sure, my style is very detailed and full of flowers.

This is me

My works are always evolving and that's one of things why I love this art.
You can find me on:


I hope to inspire you all year long.

===============

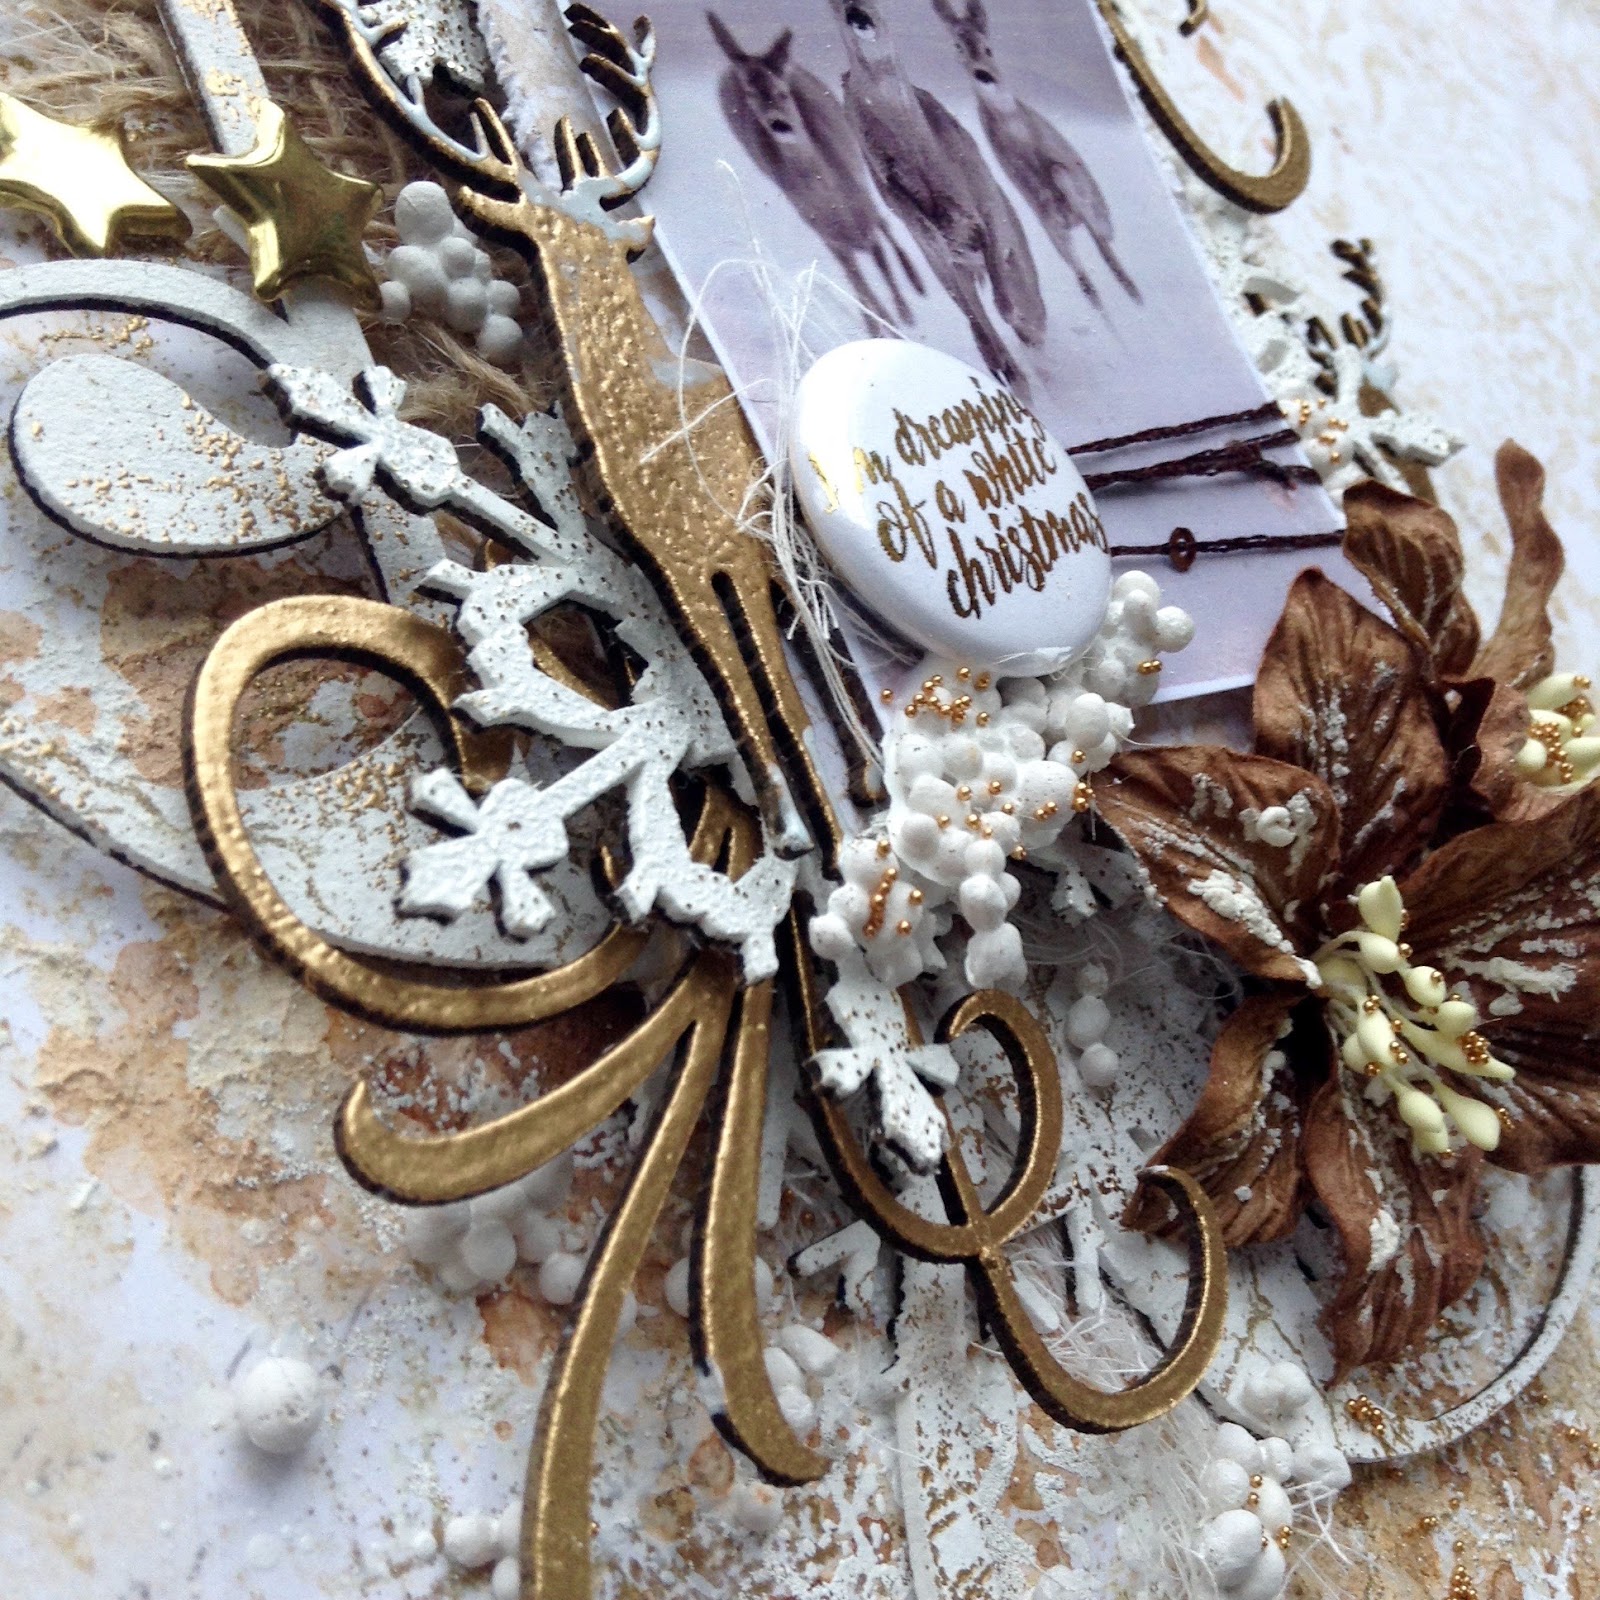
My First layout: I'm dreaming of a white Christmas.
I used the back of " Wonderland " paper from the Vintage Christmas collection for the background.
I simply put some texture paste and added a little brown ink and I finished with crackles textures stamps that I emboss with snow embossing powder
and grungy grid stamp emboss with ginger embossing powder.


The main chipboard of this layout is Snowflake Frame-Square. I started by embossing it in snow embossing powder. Then I used crackles textures stamp with brown ink pad and finish with grungy grid stamp emboss with ginger embossing powder.
To add contrast to the main chipboard I used Shabby Flakes. I made a mix of snow embossing powder and vintage gold glitter that I used to emboss the flakes.
Under the flakes I used two pieces of kit Mini Flourishes. I simply embossed with Ginger Embossing powder to bring out the flakes.

I used two deer from the kit Winter Deer also embossed in Ginger Embossing Powder.
I added dimensional paint for simulate snow.


You can better see the effect of mixing glitter and embossing powder on snowflakes here and dimension of white paint on deer.
You can see also the shinning of background create with stamps and embossing powder.

I kept the most beautiful for the end. These flowers are so beautiful. They are perfect!
I add a few micro beads on the pistils.


And a small snowflake to decorate the metallic golden deer.
Love this.

Blue Fern Studios products I've used:
Paper:
- Wonderland - Vintage Christmas
Chipboards:
- Snowflake Frame-Square
- Shabby Flakes
- Mini Flourishes
- Winter Deer
Embossing Powder:
- Ginger
- Snow
Glitter:
- Vintage Gold
Stamps:
- Grungy Grid
- Crackles Textures
Flowers:
- Late Winter Lilies

===============

My second project is " Follow your heart "
I use the " Love Song Serenade " paper from the Heartland collection as my background paper.
I added white gesso, a doily stencil and just a little bit of teal ink.

I covered the chipboard "Follow Your Heart " with black gesso and give some shinning with pigment ink silver. I added some small details with teal wire thread.
I cut the chipboard Rose Frame and after putting white gesso I added a small layer of metallic teal paint. Some flowers and beads added the final touch of the top part.

Here I used the same procedure on another piece of chipboard Rose Frame
and completed with flair. Still some beads and small
piece of cheesecloth and this part is finished.

This is my favorite part of my layout.
I covered with white gesso and emboss with Snow embossing powder
I decided to customize my chipboard Treasured Floral Frame with flowers and wire thread, exactly like the chipboard. I really love the result.
Under This chipboard I added other pieces of Rose Frame chipboard,
still altered with white gesso and metallic paint.

Then I used the white flowers Christmas Blossom and coated the center of Caribbean glitter.

Some beads ans stars sequins to add a littles details .


Blue Fern Studios products I've used:

Paper:
Heartland - Love song serenade
Chipboard:
- Rose Frame
- Treasured Floral Frame
- Follow Your Heart
Imagine ink Embossing Powder
- Snow
Glitter
- Caribbean
Stamps
-Grungy Grid
Flowers
-Heartland Roses and Blooms
- Christmas Blooms

===============

My last layout " These moment "
 I used the back of  " Love Blooms " paper from the HEARTLAND collection. I love this blue!
I slightly bleached the paper with white gesso, I used crackle textures stamp with black ink pad then I applied with texture paste. To finish the background I added a little bit of spray ink with a brush.

I used the chipboards Heartland XOXO, the bird of chipboard Spirit of Heartland
and one heart of  Heart Set. I first applied white gesso and I painted all the chipboards
 in the same way, with metallic
watercolor paint teal, white and blue.

You can see more the shinning of the paint on this picture on the chipboard with this picture.

I really love the lilies flowers of Blue Fern Studios. For this projet I chose to use the light blue of kit Spring Lilies. They are so beautiful and really perfect for my layout.

To finish I simply added several small details
everywhere on my creation: pearls, sequins and brads.

Blue Fern Studios products I've used:

Paper:
Heartland -  Love Blooms
Chipboards:
Heartland XOXO
Spirit of Heartland
Heart Set
Stamps:
Crackle Textures
Flowers:
Spring Lilies===============

Thank you for stopping by!
See you soon.
Tartine xxx

Tuesday, December 6, 2016

Vintage Christmas with Cathi

I can't believe a year has flown by and it is time to finish my term here at Blue Fern Studios!! I have loved working with the amazing products and my talented fellow team members.  I am so grateful for the wonderful opportunity to design here!!  For my last post here I have made two layouts and set of cards.


My first layout features the gorgeous Vintage Christmas collection Wonderland paper. I decided to do a snowy layout and just love these colors! I chose a gorgeous wintry vintage image of a family gathering pine boughs for the holidays.


Here in this first close up I have added some layers under the photo using the Vintage Christmas 2 Calling Cards cutouts. I love the Snowflake Frame which I have embossed with Imagine Ink Icicle Embossing Powder. I've added a snowflake from the Shabby Flakes collection which has been embossed with Icicle and Cotton Candy Imagine Ink Embossing Powder. 


In this photo you can see how I've used several background stamps to build up texture. I have used the Making Plans stamp, the Crackle Textures stamp and the Coarse Fabrics stamps using various distress inks. I also edged  my chipboard with Festive Berries Distress Ink to tie into the colors of the paper.


I've used some gorgeous flowers on this layout, the beautiful red Christmas Bloom and pink Soft Blossoms. For the title of my layout I used the Wonder chipboard from the Wish Wonder Dream set, and again used Icicle Imagine Ink Embossing Powder

Blue Fern Studios Supplies:

Paper:
Blue Fern Studios Vintage Christmas ~Wonderland
Blue Fern Studios Vintage Christmas 2 ~Calling Cards

Chipboard:
Shabby Flakes
Snowflake Frame


Imagine Ink Embossing Powder:
Icicle
Cotton Candy

Stamps:
Making Plans
Coarse Fabrics
Crackle Textures

Flowers:
Christmas Blooms
Soft Blooms


My next project is a set of cards using both sides of the Vintage Christmas 2 Jolly paper. I always love to use the Calling Cards page with its gorgeous cutouts and images to make a set of cards when I can.


In my first card I used the beautiful Holiday Deer chipboard piece, embossed in Antique Gold Imagine Ink Embossing Powder. The Yours and Mine at Christmas Time actually came from the branding strip at the bottom of one of the papers!  The red and aqua flowers are part of the Christmas Blooms set while the white one is from the Soft Blooms set.  To finish off the card I used some ribbon from my stash and sewed in brown around the edge of the card.


I love the image on my next card, so much fun! I have added the Christmas Cheer sentiment from the Calling Cards paper as well.  Underneath my image I have added a bit of twine from my stash. The beautiful snowflakes are from the Let it Snow set, embossed appropriately in the Snow Imagine Ink Embossing Powder! The red flower is from the Memoires Blooms and the brown lilies are from the Winter Lilies set.  Again, I have finished off the card with some brown stitching along the edges.


For my final card, I've used the other side of the Jolly paper for the background and some papers from the Calling Cards sheet again.  The flowers are both from the Christmas Blooms set.  The foliage chipboard is from the Layering Stems set and is embossed in Sage Imagine Ink Embossing Powder. I have added some ribbon and a small pine cone from my stash and stitched along the edge to finish it off.


Blue Fern Studios Supplies:

Paper:
Blue Fern Studios Vintage Christmas 2~Jolly
Blue Fern Studios Vintage Christmas 2 ~ Calling Cards

Chipboard:
Deer Ornament
Let it Snow
Layering Stems

Imagine Ink Embossing Powder:
Antique Gold
Snow
Sage

Flowers:
Memoire Blooms
Christmas Blooms
Late Winter Lilies


My final layout for Blue Fern Studios features another vintage image and the gorgeous Vintage Christmas Let it Snow paper as its base.


In this first close up you can see the beautiful Ruth's Doily peeking out from under the photo cluster, embossed in Golden Bricks Imagine Ink Embossing Powder. I have used more of the Calling Cards cutouts tucked underneath the image to build up the layers.


I have again used more of the beautiful red Christmas Blooms flower and the chocolate brown Late Winter Lilies as my flower cluster.  I have used a Mini Flourish chipboard embossed in the Pyrite Image Ink Embossing Powder as a finishing touch on the photo cluster.


The Night Before Christmas chipboard piece has been embossed in Ruby Imagine Ink Embossing Powder and you can see the background stamping I have done featuring stamps from the Forever, Essential Textures, and Texture Circles sets.  I finished off this cluster with another Late Winter Lily. 

Blue Fern Studios Supplies:

Paper:
Blue Fern Studios Vintage Christmas 2~Let it Snow
Blue Fern Studios Vintage Christmas 2~Calling Cards

Chipboard:
Ruth's Doily
Mini Flourishes
Night Before Christmas

Imagine Ink Embossing Powder:
Golden Bricks
Ruby
Pyrite

Stamps:
Forever
Essential Textures
Texture Circles

Flowers:
Christmas Blooms
 Late Winter Lilies

I have really enjoyed my time here with Blue Fern Studios and look forward to seeing what new products and new inspiration arrive next year with the amazing new 2017 team. I hope you all have a wonderful Christmas and a great 2017!!

Tuesday, January 19, 2016

My first projects for Blue Fern Studios - Karolina Czajkowska

Hi everyone! I am so excited to be here today with my first projects for Blue Fern Studios. 
Such an honor and a pleasure to be able to be a part of this fantastic team!


First, let me introduce myself. It's the most difficult moment, because I'm not really good in talking about myself. My name is Karolina Czajkowska and I live in Poland in one of the biggest city Łódź. I'm 26 and I'm an architect. I finished my study 1,5 year ago. 

I started my scrapbooking adventure 4 years ago and definitely it was a love at the first sight ;)
Scrapbooking is a huge part of my life, and it is more than a hobby by now. I can't imagine my day without scrapping and I am very sad when life and obligations do not allow me to go to my crafty space. One year ago I started to lead classes in Poland and abroad and I do love it! I think I'm mixed media girl. I'm pretty sure that this is the best way for me to find myself and my own style. And what my style is?
I still don't know, but defenitely it's not a clean&simple style ;)

You can find me on:

I created 2 layouts and a winter canvas to share with you today:


Layout "Delightful love"

My first layout is very soft and girly, I think. In the picture you can see two little ladies - my goddaugters. They are so cute, aren't they?


This page based on paper from the Love Story collection. I started my work of covering the entire background under my composition with using clear gesso. Then I made a composition using papers from Déjà Vu collection and of course I added some chipboard pieces.


I chose three chipboards - this one which you can see in the background its's a smaller piece of the Quatrefoil panel. First I used it like a stencil and then I covered it using mists and water paints in pink, lavender and warm beige colors.


I covered two smaller chipboards, a frame with "Love" inscription and "Delightful", using two embossing powders - very soft Cotton Candy and more contrasty Mystic Plum.


In the next step I added some flowers and embellishments of course, to make my projects and a composition richer. Then I added some color mists with paintbrush around my composition. Finally I decided to stamp a background a little bit.

Blue Fern Studios Products Used:

Papers: Love Story collection - The Grand Ball, Déjà Vu collection - Petites Cartes and La Plume

Chipboard: Quatrefoil Panel, The optimist word set, Memory frames

Embossing Powders: Cotton Candy, Mystic Plum

Stamps: Essential Texture 


Layout "Happy Way"

My second layout is defenitely more colorful with a lot of my favourite turquoise. I like to treat layouts a little bit like art journal pages - I mean: telling some story, capturing thoughts and feelings, not only pictures and memories.


I really like to create layouts on the dark background - this makes the colors "explode". This time I chose a beautiful paper in the deep navy blue color from the Sanctuary collection. I love a pattern of this paper. I prepared a photo and then I knew which colors I had to use. I have combined papers from two different collections - Ombre Dreams and Frolic and when I decided where my composition will be, I covered this area with gesso. I also used a modeling paste and stencils. In the next step I reached for a stamp with text and a pearl embossing powder. I wanted to connect it to the pattern from a basic paper.


On my layout you can find two chipboard pieces - the smallest circle from Beaded Strings set and beautiful Ironworks medley. Both of them I covered with a lot of different embossing powders to make a colorful embellishments, matching to my vision of this project. Then I added some light turquoise paint on all gaps.


After adding flowers and color mists around my composition, I stamped again using two stamps sets - this time with a black ink.


Blue Fern Studios Products Used:

Papers: Sanctuary collection: Bountiful, Frolic collection - Petits Moments and Friendship, Ombre Dreams collection - Dream Cards
Chipboard: Beaded strings, Ironworks medley
Embossing Powders: Garnet, Heavenly, Fern, Azure, Mystic Plum, Iris, Honey,
Glitter: Caribbean
Stamps: Essential Texture, Halftone

"Winter time"

My third project, which I would like to share with you today is a winter canvas. I know that Christmas time is gone, but we still have winter and maybe it's not my favourite season, but I really like winter projects!


In the background you can see old book pages. I really like this vintage effect. The next layer is a little piece from the Mini rings panel. I sprayed it with a dark brown mist and arranged it in such a way as to stick out from both sides of my composition. Next I built a very dimensional composition with papers from three different collections Déjà Vu, Autumn Anthology, Paisley & Vine and chipboard frame.


On the close-ups you can see all shades of my frame. First I covered frame with gesso and next I mixed gesso with a blue pigment and with using sponge I started to dabbed on blue accents.
I also added some stamps.


Smaller flakes I covered with white acrylic ink to make a very shiny surface. Then I added some translucent glitter. As a result, my project is more sparkling.


In the background you can also find some stamps and little black dots.


And finally a deer - this handsome gentelman would be a main point of my canvas. First I treated a chipboard with white gesso and then I distressed the edges.

Blue Fern Studios Products Used:

Papers: Déjà Vu collection - La Plume, Autumn Anthology collection - Mercantile, Paisley & Vine collection - Vineland
Chipboard: Winter Deer, Snowflake frame, Shabby flakes, Mini rings panel
Stamps: Essential Texture


I hope I have inspired you today. See you next time :)

Hugs,
Karolina